The game loop
The game loop is the core of every game. It's what allows us to update the game logic and render the graphics every frame –hopefully 60 times per second!

In Phaser, the game loop is handled automatically via game states. A game state represents one "screen" in our game: the loading screen, the main menu, a level, etc. Each state is divided into phases or steps, the most important are:
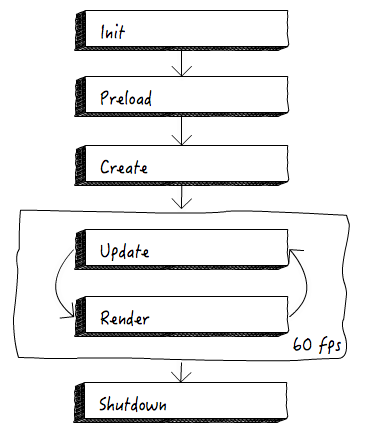
As you can see, update and render form the game loop. These phases are called automatically each frame, so we don't need to worry to implement a game loop and keep track of the timing.
A game state in Phaser is just an Object with some methods that we can override. We will be overriding some of these in order to load an image and render it on the screen.
Tasks
Create a game state
As before, edit
main.jsso it looks like this:PlayState = {}; window.onload = function () { let game = new Phaser.Game(960, 600, Phaser.AUTO, 'game'); game.state.add('play', PlayState); game.state.start('play'); };
Load and render an image
To load an image, we will make use of the
preloadphase of our game state. In this phase we will load all the assets that we require (images, sound effects, etc.).To use a phase in a game state we need to add a method with a matching name. In our case, we will be creating
PlayState.preload:// write this under // PlayState = {}; // load game assets here PlayState.preload = function () { this.game.load.image('background', 'images/background.png'); };Things to note:
- We have a reference to the
Phaser.Gameinstance inside the game state viathis.game. - When we load an asset, we assign it an (arbitrary) key. We will use this key later to reference that asset.
- We have a reference to the
To render an image we need to create an instance of
Phaser.Image, which is one of the many game entities in Phaser. We can do this using thegame.addfactory, which will automatically add the image to the game world so it gets drawn on the screen automatically every frame.Add the following method to our
PlayState:// create game entities and set up world here PlayState.create = function () { this.game.add.image(0, 0, 'background'); };We are providing the X and Y coordinates –
(0, 0)is the top left corner– and the key to the asset we just loaded.
If you check out the game, you should see a pretty background drawn in the screen:

Checklist
- The background image is rendered in the screen.
Rendering an image in the game loop is the first step in crafting games. Get ready for the next step!
Download
Are you stuck? Take a look at the source code for this step.